RoboCupRescue 2009 - Rescue Simulation League Team Description IAMRescue - Infrastructure Competition (United Kingdom)
Kathryn Macarthur, Sarvapali Ramchurn, Cameron Skinner, Sebastian Stein, Ruben Stranders, Perukrishnen Vytelingum, Nick Jennings
School of Electronics and Computer Science, University of Southampton, Southampton, SO17 1BJ, United Kingdom
http://www.sf.net/projects/ecskernel · http://www.soton.ac.uk · http://www.aladdinproject.org · http://www.springframework.org/ · http://www.indietechnologies.com/ · http://sourceforge.net/projects/roborescue/
Abstract In this paper, we describe the new version of the ECSKernel and the 3Dviewer. The ECSKernel has been improved with new features such as a new map generator, clustering tools, and better agent performance evaluation tools. The 3Dviewer has been redesigned using JAVA3D and improves upon the previous version by providing a better interface to view a Robocup rescue map, and also adds single-person view for each agent in the system. Both ECSKernel and the 3Dviewer are designed using the Java programming language using Object Oriented design which allows easy extension of the code to implement the user's own agents or components.
1 Introduction
Today, there is considerable endeavour in the domain of disaster management for distributed, agile and autonomous response in environments where uncertainty, scarcity of resources and bias are endemic. The Robocup Rescue platform addresses some of these issues in this domain. In particular, the aim is to design effective heterogeneous agents that manage the behaviour of ambulances, fire brigades and polices. However, the RobocupRescue platform is limited in its extendability given that it was mainly designed for competition purposes. Without proper viewers for agent performance metrics, tools to dynamically change the scenario being run, and the ability to control an agent's behaviour during a run reduce the usability of the platform when it comes to evaluating agent coordination algorithms. Moreover, it is hard to use the current viewer to explain and understand how agents perceive their environment. Without a 3D view of the scenario it is difficult to understand what the agents can see and how the situation is evolving on the map.
To address these challenges in the Robocup Rescue domain, we developed the ECSKernel in 2007. However, the ECSKernel only allowed users to control ambulance agents' behaviour and allowed the user to tune only very few parameters of maps or of the scenario being played. Moreover, it did not provide a 3D view of the system. To remedy this, we developed and open-sourced (under BSD license) ECSkernel version 1.0 which incorporates a number of new features and a 3D Viewer all developed using the Java programming language. In the following sections we detail the design of the ECSKernel and the 3D viewer.
2 ECSKernel
ECSKernel was first developed by the University of Southampton in 2006 as part of the ALADDIN (Autonomous Learning Agents for Decentralised Data) Project, a five-year project funded by BAE Systems and the Engineering and Physical Sciences Research Council (EPSRC) to research agent-based technologies to work in emergency situations. The system won first prize in the 2007 Robocup Rescue Infrastructure Competition. It was presented at AAMAS 2008 in a demo paper [1]. Written in Java, it connects to the Robocup Rescue Simulation System as a Viewer, such that it receives and maintains a complete world view from the kernel. The ECSKernel manual is provided in appendices A, B and C.
3 Features of Version 1.0
The core features provided by ECSKernel version 1.0 are clustering, a communication network, adjustable parameters, controling activity of agents, and outputting given values to files and graphs at run time. These will be described in a bit more detail in this section.
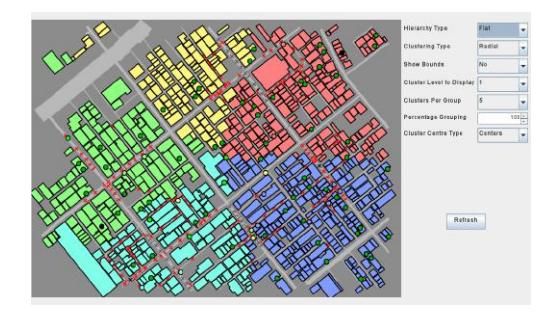
Clustering The clustering aspect of ECSKernel allows the user to arrange their agents into set groups, which are communicated to the agent via the kernel. As such, the agents can then be programmed to work in those groups in any way you wish. Groups can also arbitrarily be changed at runtime using the GUI shown in Figure 1.
Communication Network A new communication network has been implemented on top of the existing Robocup Rescue one, so that all messages no longer go via the kernel, instead going via ECSKernel; this means that the sense and tell distances of agents can be changed at run time, as these changes will then be reflected in ECSKernel's actions, without having to change the kernel code. Also, it is easier to write arbitrarily many new types of message for your specific use, by extending the ecskernel.communicate.AMessage abstract class. Statistics about throughput can be written into a new implementation of the ecskernel.communicate.ICommunicationNetwork interface and gleaned fairly easily from the messages which are communicated through ECSKernel.
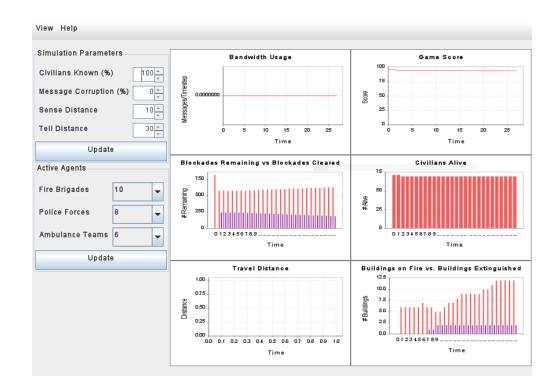
Parameters A number of parameters have been implemented in ECSKernel, such as percentage of world known, percentage message corruption, tell distance and sense distance. These parameters can be changed at run time by using the main ECSKernel control panel, shown in Figure 2.
Activity of Agents There are controls in the ECSKernel control panel which allow the user to set an arbitrary number of AmbulanceTeams, FireBrigades and/or PoliceForces to be active. Any agent which is inactive will travel to its nearest Refuge as best it can, and will stay there until it is informed that it should be active again.
Output of Metrics at Run Time A number of graphs on the right of the control panel allow the user to view dynamically updating metrics on performance of their agents. At the moment, the metrics used are: bandwidth usage, game score, blockades remaining vs. blockades cleared, civilians alive, travel distance, and buildings on fire vs. buildings extinguished. These graphs are updated by generic updaters, which calculate the values and output them to the graph series as well as to their own file.
3.1 Future Features
A number of features are planned to be implemented in ECSKernel Version 2.0; they are discussed in this section. If you have any suggestions for future functionality please contact the author.
Coordination Framework We aim to implement a coordination framework and API based on the Electronic Institutions principles of scenes and transitions. This should make it easier for a researcher to test a given coordination mechanism on the platform without having to change agent code; instead implementing the interfaces provided.
Spring Framework We plan to use the Spring Framework in future for loading the extensible aspects of ECSKernel. This should make it much easier for developers to 'plug in' their own components; instead of modifying classes they should be able to define their own configuration in an XML file and indicate that it is the configuration to be loaded.
4 The 3D Viewer
While the ECSKernel handles the technical aspect of the simulation, it is also important to engineer the visual aspect of the simulation to enable users to understand how agents are performing. In particular, when agents are acting in their environment, it is important to see how much they can see and how the simulation is proceeding. Up to now, the platform has been provided with a 2 dimensional viewer that provides the overall view of the agents and the map. While the 2D viewer is useful in giving the user a good perspective of the performance of the agents (e.g. how agents are successful at tackling fires or at rescuing civilians), it does not provide the user with a view of how agents perceive the environment. In particular, it is important to see what each agent can see or knows about the environment. Moreover, the current competition attracts very little attention from the public since the 2D viewer is not easy to understand for the general public. The previous 3D Viewer developed at the University of Freiburg was useful for that purpose until the new version of the Kernel was released. Moreover, the previous version was not maintainable given that it was built upon unmaintained C++ libraries.
Against the above background, we have developed a new 3D viewer. In the next subsections, we detail the various features of our 3D viewer.
4.1 Features of the 3D viewer
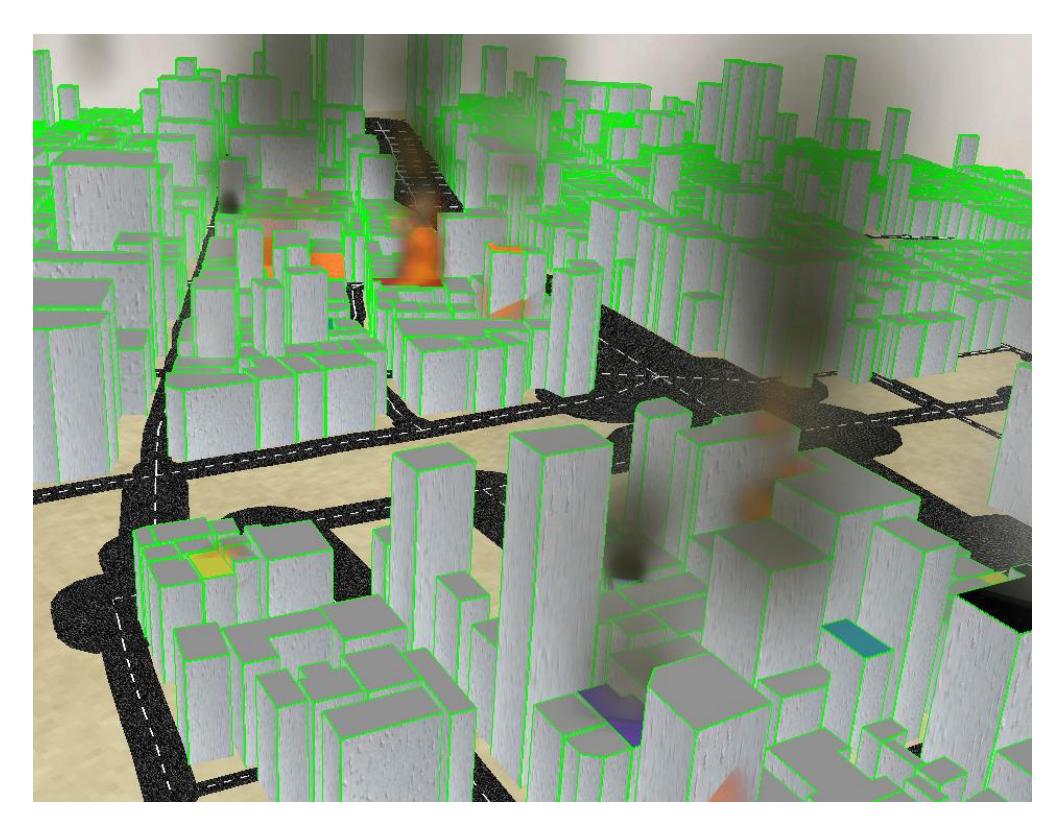
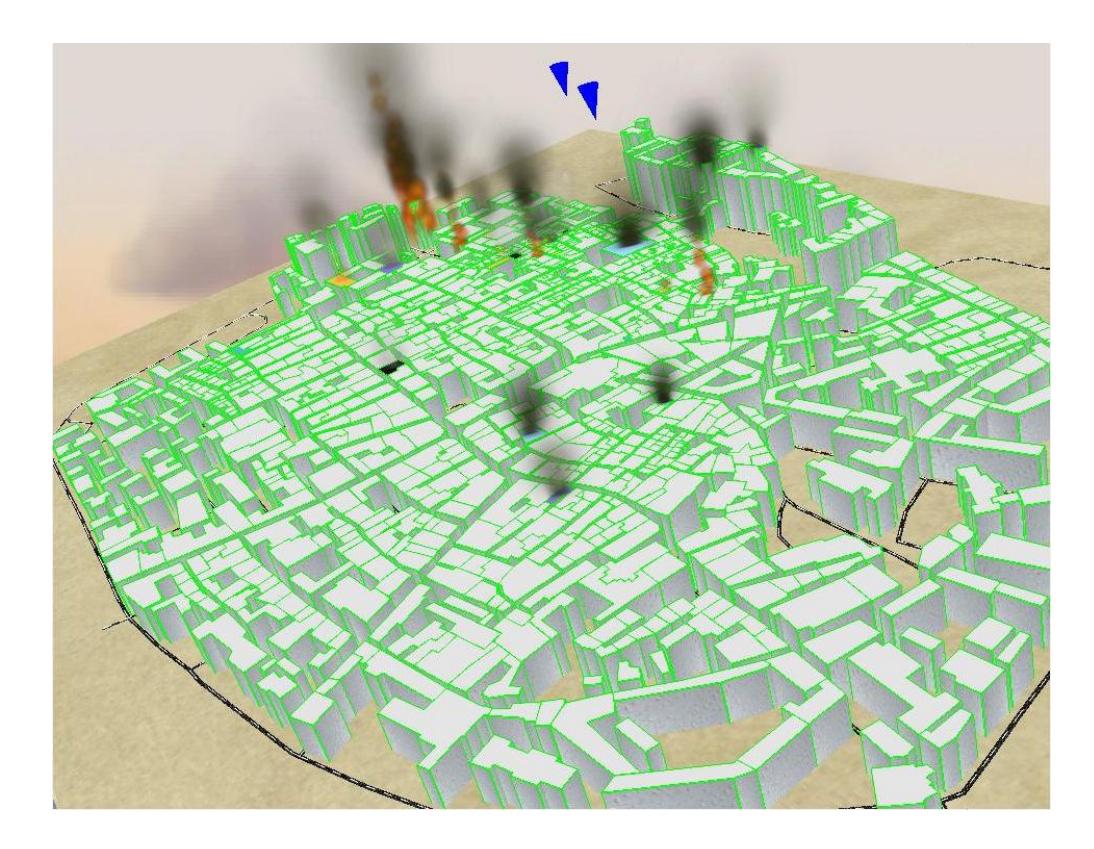
The 3D viewer is coded in using JAVA 3D. Our viewer is coded in an object-oriented fashion that allows for easy extendability. The viewer can be run on its own to simulate various scenarios or agent coordination algorithms or can be connected to the RoboCupRescue platform to display the events happening in the simulation. The 3D viewer can be used to display the whole map with pointers indicating agents moving around or civilians in buildings. It is possible to pan and zoom and choose preset perspectives (North, South, East or West) and display fires and smoke. Figure 3 gives a snapshot of the viewer on the small Kobe map while Figure 4 gives the overall perspective of the Foligno map with 3 police agents moving around.
In order to display fires and smoke in a realistic way, we used the free libraries of GenesisFx provide by indie technologies. These libraries allow users to code in Java many effects such as explosions, plumes, and fire with various tuneable parameters. Since these effects are built using proper physical principles, they help build a high degree of realism in the 3D viewer.
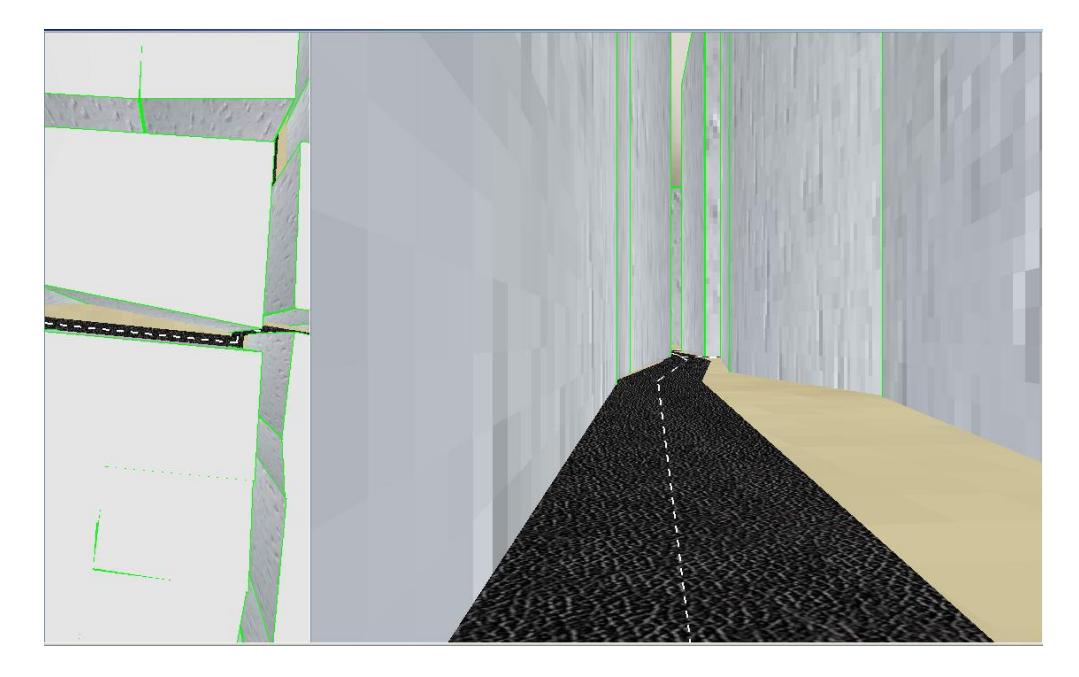
In addition to the general view of the simulation, the 3D viewer provides a singleperson view of the map. The viewer provides the user with a list of agents on the map and by clicking on those, it is possible to see exactly what an agent can see around it. Figure 5 shows the single agent view.
The 3D viewer is still at a development stage and will be ready for display at RoboCup 2009 in Budapest.
A Running ECSKernel
This appendix provides instructions for running ECSKernel and the RoboCup Rescue platform.
A.1 Prerequisites for running ECSKernel and Robocup Rescue
ECSKernel and Robocup Rescue require the following to be installed before they can compile and run:
- Linux (currently only tested under Ubuntu, but should work under other distributions);
- make (found in the build-essential package on Ubuntu);
- gcc and g++ (found in the g++-4.2 package on Ubuntu;
- Sun Java binaries (found in the sun-java6-jdk package on Ubuntu);
- Optional: Subversion client (found in the subversion package on Ubuntu if not already installed).
A.2 How to run Robocup Rescue
To run the Robocup Rescue platform, a number of steps must be taken. They are as follows:
- Obtain the source:
- (a) Download the source code tarball from http://sourceforge.net/projects/roborescue/, or download the latest SVN version.
- (b) Un-tar the source into a folder of your choice (hereby referred to as rcr-root).
- Compile the source:
- (a) Using a terminal navigate to the 'rcr-root/programs' directory;
- (b) Type make into the terminal, and press enter.
- Run the simulators:
- (a) Using a terminal, navigate to the 'rcr-root/boot' directory;
- (b) Type ./all.sh into the terminal, and press enter; this command can be followed by the name of a map in the 'rcr-root/maps' directory, if you wish to use a map other than Kobe.
- Once 'Start your agents' has appeared in your terminal and a window like that in Figure ?? has opened, run the sample agents:
- (a) Ensure you are still in the 'rcr-root/boot' directory;
- (b) Type ./sampleagents.sh into the terminal, and press enter.
A.3 How to run ECSKernel
- Obtain the source:
- (a) Download the source code tarball from http://sourceforge.net/projects/roborescue/, or download the latest SVN version.
- (b) Un-tar the source into a folder of your choice (hereby referred to as rcr-root).
- Compile the source:
- (a) Using a terminal navigate to the 'rcr-root/programs' directory;
- (b) Type make into the terminal, and press enter.
- Run ECSKernel: There are two methods of doing this, either by using Eclipse, or by using a terminal:
- Using a terminal:
- (a) Using a terminal navigate to the 'rcr-root' directory;
- (b) Type ./start.sh into the terminal, and press enter.
- Using Eclipse:
- (a) Open the downloaded ECSKernel project in Eclipse;
- (b) Wait whilst Eclipse ensures the project is built correctly;
- (c) Right-click the ecskernel.bootstrap.EcsKernelStart class in the Navigator pane, and click Run.
- ECSKernel should then load, and, if this is the first time you have run it, it should prompt you to enter your default map and config file directories. The map directory will usually be 'rcr-root/maps'; it is advised you create a new directory for your config files.
- The main ECSKernel menu will load once first-run settings have been defined. From here, there are a number of possible courses of action, indicated by menu buttons:
- Run ECSKernel: run one or more times in succession, with one variable changing, or all variables static;
- Generate a new (randomised) map: enter your chosen parameters, and click generate. A map viewer/editor will launch once the map has been created;
- Generate a new (randomised) gisini.txt: enter your chosen parameters and the map you wish to generate the new file for, and click generate. As with generating a new map, the map viewer/editor window will launch once generation has completed;
- View and/or edit a map: view the map of your choice and add or remove important buildings, agents, blockades and fire points to or from it.
B Customising ECSKernel
This appendix describes how to customize ECSKernel.
B.1 Simulator Paths
To change the location on disk of the Robocup Rescue simulators you will need to edit the shell scripts in the boot/autorunboot folder to point to where you have your scripts.
The Autorun package we use is quite restrictive with where it reads the simulators from, so unfortunately it is imperative that the 'boot/autorunboot folder must always be present, and always have the simulator scripts in it, even if they just point to scripts elsewhere.
B.2 Maps
There is a map reading API included in a .jar file in the ECSKernel distribution. It has the capability to read into a rescuecore.Memory object maps from road.bin, node.bin, and building.bin files, and the location of agents, important buildings, fire points and blockades from gisini.txt and blockades.lst. There is a GUI for the mapreader included with ECSKernel; it displays such maps once they have been read in, and allows a user to add and remove elements at will.
A full list of elements that can be added and removed with mapreader is as follows:
- Blockades;
- Centers:
- AmbulanceCenters;
- FireCenters;
- PoliceCenters.
- PlatoonAgents:
- AmbulanceTeams;
- FireBrigades;
- PoliceForces.
- Civilians;
- Fire Points;
- Refuges.
B.3 Forms
The creation of the easyformlib API for use with ECSKernel means it is much simpler to make a form in Java, without the need for lots of repeated code or a deep understanding of Java Swing GUI layouts.
To make a new form, create a new class which extends easyformlib.AFormPanel. This class should be implemented to contain an ArrayList of components required in the form. To add a component to the form, simply create it and add it to the ArrayList in the initComponents() method. easyformlib will take care of the rest for you, laying out the form when it is created.
Components to be added to the form are included in easyformlib: each include a given Swing component, linked to a label. These can be found in the easyformlib.components package.
To glean user input from the form, simply call the getUserInputMap() method inherited from the superclass, and user input will be returned in the form of a HashMap consisting of Objects indexed by Strings (the labels you have used on your components). These Objects can be cast to the relevant objects gleaned from the components.
B.4 Clustering Algorithms
To make a new clustering algorithm, make a new entry in the ecskernel.cluster.enums.ClusterType enumeration, containing the preferred name for your algorithm. Then create your class in the ecskernel.cluster package. This will then be usable within the ECSKernel ClusterManager GUI.
B.5 Connecting Agents
To use your own agents with ECSKernel, you will need to write a wrapper so that ECSKernel can communicate with them. This is done by implementing all methods in the ecskernel.wrapper.IECSKernelAgentWrapper interface.
You will then need to make a launcher for your agents: ecskernel.bootstrap.launch.SampleAgentLauncher is a sample class which should work for most agents, if you copy-paste the code and change the agent class names, ensuring they are fully-qualified. If this does not meet your needs you can always implement the ecskernel.bootstrap.launch.IAgentLauncher interface instead.
This launcher will then need to be 'plugged in' to the ECSKernel infrastructure, by adding a new line to agents.txt in the resources folder, using the format DisplayedAgentName=FullyQualifiedAgentName.
Ensure your agent is on the classpath, run ECSKernel and select your agent from the Run pane of the initial control panel.
B.6 Custom Performance Metrics
To use your own custom performance metric, you must implement your own class using the ecskernel.visualise.controlpanel.chartupdaters.IUpdater interface.
If you wish your class to output to file as part of your updater's behaviour, simply make a new instance of the ecskernel.write.Logger class in your constructor and write to it whilst updating.
If you wish your class to update a chart object, you must first add your chosen metric to the ecskernel.visualise.controlpanel.util.ChartType enumeration. Do this by adding a new line below the other chart types at the top of the class, specifying the title of the chart, the class holding the chart (you will create this in a minute), and a boolean flag representing whether or not your chart is a bar chart.
Next, make your chart. Make a new class, and make it extend visualise.controlpanel.charts.bar.ABarChart for a bar chart, and visualise.controlpanel.charts.line.ALineChart for a line chart.
You can then add this chart into your own GUI by using your entry in the Chart-Type enum. An example of how to do this can be found in the visualise.controlpanel.ControlPanel class, in the initialiseCharts() method.
C Known Bugs
The known bugs with ECSKernel are listed below:
– If start.sh is run anywhere but in the root folder of the robocup distribution then the ALADDIN logo will not load as the window icon.
References
- Ramchurn, S.D., Rogers, A., Macarthur, K., Farinelli, A., Vytelingum, P., Vetsikas, I., Jennings, N.R.: Agent-based coordination technologies in disaster management. In: AA-MAS '08: Proceedings of the 7th international joint conference on Autonomous agents and multiagent systems, Richland, SC, International Foundation for Autonomous Agents and Multiagent Systems (2008) 1651–1652